Understanding... Exposure Compensation
Most digital cameras provide exposure compensation.
What is exposure compensation -- and how do
we use it to obtain better exposed pictures?
This OnePager � tutorial makes
it all clear.
The Short Description
Exposure Compensation is a feature of a camera that allows you to adjust the exposure measured by its light meter. Usually, the range of adjustment goes from +2 to -2 EV in 1/3 steps.
The Long Description
If you look at the QuickFact � Sheet for a digital camera on this site, you'll notice this entry:
|
Exposure Compensation |
+/- 2 EV in 1/3 EV steps |
|
This means that you can adjust the exposure measured by the light meter by telling the camera to allow more light in (positive exposure compensation) or to allow less light in (negative exposure compensation).
Technically, you could take note of the exposure measured by the light meter, and then switch to Manual mode and adjust it manually yourself.
Depending on how your digital camera deals with exposure compensation (and the shooting mode used), it may adjust the aperture while maintaining the shutter speed constant, it may adjust the shutter speed while maintaining the aperture constant, or it may adjust both the aperture and shutter speed. On the digital camera I am using for this tutorial, the camera first adjusts the aperture while maintaining the shutter speed constant; when it can't adjust the aperture anymore, it then adjusts the shutter speed.
| Camera Metered Exposure |
| F1.8 |
F2.8 |
F4 |
F5.6 |
F8 |
| 1/500 |
1/250 |
1/125 |
1/60 |
1/30 |
So, let's say that the light meter measures a shutter speed of 1/125 sec. and aperture of F4.0.
| +1EV Exposure Compensation |
| F1.8 |
F2.8 |
F4 |
F5.6 |
F8 |
| 1/500 |
1/250 |
1/125 |
1/60 |
1/30 |
When I dial in a +1EV exposure compensation, the meter opens up the aperture by 1 f-stop to F2.8, while still maintaining a shutter speed of 1/125 sec. In effect I have purposefully dialed in an over exposure.
| -1EV Exposure Compensation |
| F1.8 |
F2.8 |
F4 |
F5.6 |
F8 |
| 1/500 |
1/250 |
1/125 |
1/60 |
1/30 |
If I dial in a -1EV exposure compensation, the meter closes down the aperture by 1 f-stop to F5.6, while maintaining the same 1/125 sec. shutter speed. In effect I have purposefully dialed in an under exposure.
Exposure Bracketing
Why would anyone want to dial in an over or under exposure on purpose?
Because there are certain situations where the light meter of your digital camera can be fooled.
As an example, say you are taking a scene where there is an abundance of light around your main subject (for example, at the beach on a sunny day, or surrounded by snow). In this case, using Weighted-Average metering, your camera might be 'deceived' by the abundance of light and expose for it by closing down the aperture and/or using a faster shuter speed (assuming ISO is constant), with the result that the main subject is under-exposed. By dialing in a positive exposure compensation, you are making sure that your main subject is correctly exposed -- though the surroundings would be overexposed.
Another example would be the case where the surrounding might be too dark, and the camera exposes for the lack of light by either opening up the aperture and/or using a slower shutter speed (assuming ISO is constant), then the main subject is over-exposed. By dialing in a negative exposure compensation, you would in fact be under-exposing the surroundings, but properly exposing the main subject.
These are only two of the many situations where dialing in a positive or negative exposure compensation makes sense. In fact, many photographers will bracket their exposure when taking an important shot by taking one shot using the camera's measured exposure, a second one at positive exposure compensation, and a third one at negative exposure compensation.
Many digital cameras now include Automatic Exposure Bracketing (AEB) where the camera will take three shots with one press of the shutter release button: one at the camera measured exposure, a second at a negative exposure compensation (usually -1/3 EV, though some cameras allow you to specify the amount), and a third at a positive exposure compensation (usually +1/3 EV, though some cameras allow you to specify the amount).
Positive Exposure Compensation
In this example, the camera used a slower shutter speed while maintaining the aperture constant.
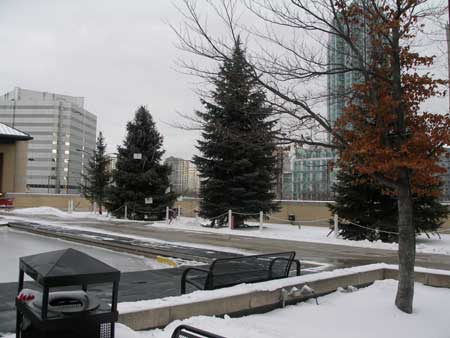
Camera Metered Exposure
Aperture = F4.0, Shutter Speed = 1/400 sec.
The bright sky "fools" the meter and the trees come out a bit dark
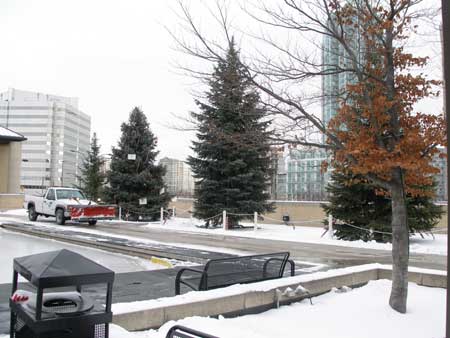
Exposure Compensation: +1.0 EV
Aperture = F4.0, Shutter Speed = 1/200 sec.
By applying a positive exposure compensation, the trees now show details
Negative Exposure Compensation
In this example, the camera used a faster shutter speed while maintaining the aperture constant.
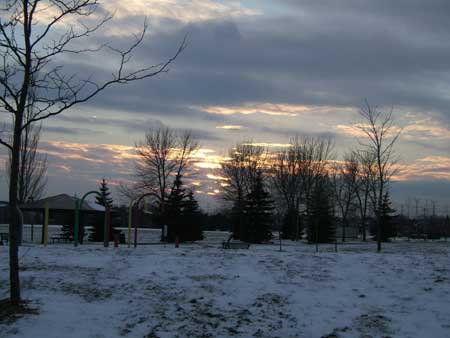
Camera Metered Exposure
Aperture = F3.4, Shutter Speed = 1/340 sec.
The dark surroundings "fools" the meter and the sunset colours appear washed out
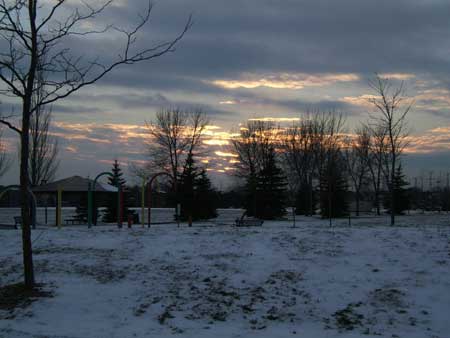
Exposure Compensation: -0.7 EV
Aperture = F3.4, Shutter Speed = 1/400 sec.
Applying a negative exposure compensation brings out the rich colours of the sunset
